How To Create Feed URL With FeedBurner | Hacking Is Magic

FeedBurner is a web feed management provider. FeedBurner provides custom RSS feeds and management tools that will help to your blog reader to get regular updates of your blog posts via email or Google Reader. You might have seen the feedburner ‘chicklet’ and the news letter sign up on various blogs as shown below.

This post will help you to setup a Feedburner for your blog.

Follow the Steps Below :

  1. Go to your FeedBurner account or Login.
  2. Type your blog or feed address URL. If you are using WordPress then URL looks like http://example.com/feed – replace example.com with your domain name.
  3. Click on the Next button.
  1. Here you can change the Feed Title and Feed address as per your choice (its optional but is recommended as it acts as a brand name for your feed)
  2. Click on the Next button to proceed further.
  1. Your feed URL will now be successfully created. Click on Next for Step 2.
  1. Select the Check boxes that you want and click on Next button.

You have now successfully setup the feed URL for your feedburner account.

Enable email Subscription, Feed Count,etc

  1. Click on the Publicize tab then go to Email Subscription on left sidebar.
  2. Click on the Activate Button.(See screenshot below)
  1. Copy the code and paste it into your blog.  Click on the Save button.

In the same way you can activate FeedCount.
  1. Click on FeedCount on the left sidebar.
  2. Select the color scheme of your feed chicklet that you want to show on the blog.
  3. Click on the Activate button and copy the code shown next to paste it into your blog.
Hope you liked this tutorial on how to setup your Feedburner account for your blog. Do drop in your feedback through your comments below
Read More...

How to Set Up a Free WordPress Newsletter Using FeedBurner | Hacking Is Magic

If you’ve ever looked into sending out a regular newsletter for your site, you’ve probably come to the conclusion that you’ll either need to run the email from your own server, or you’ll need to sign up with a professional email service.  
                                  
Running emails to a large list of addresses from your own server can get tricky. The world of email and spam and spam-blockers can be very complicated. In short, there’s a good chance a lot of your emails may never end up going to your users. Professional email services can be good, and they offer a lot of advantages, but they can also be expensive. Some may have free services for a low number of contacts, but once you go above that, you’ll need to start paying.

A third option, and a FREE one, could be to use FeedBurner as your newsletter delivery service.

Advantages and Disadvantages of Using FeedBurner

There are both advantages and disadvantages to using FeedBurner. We’ll go over some of them below, and then we’ll run through how to set up a newsletter with the FeedBurner service.

Advantages


  1. It’s FREE!
  2. You can brand your email so that it looks as if it’s coming directly from your site.
  3. FeedBurner is owned and run by Google. This means your email is much more likely to get through to your intended contacts than it would be if you sent emails from your own server.

Disadvantages


  1. The ability to customize the look of your newsletters is limited.
  2. There are no hardcore statistics you might get with a professional service.
  3. You can send out simple newsletters whenever you like, but it doesn’t offer any type of auto-responder service as you might get with a professional service.

How to Set Up a Free WordPress Newsletter through FeedBurner

The basic idea behind all this is really very simple. And so we’ll outline it first, and then go into detail.
  1. Set up a separate blog on your site only for your newsletter. (e.g. mysite.com/newsletter/)
  2. Set up an account for that blog (not your main domain) on FeedBurner.
  3. Get the email subscription form code that lets visitors enter their email address.
  4. Place that code on your main domain.
  5. Whenever you want to send out a newsletter, simply write a post on the Newsletter blog (not the main site).

Featured Plugin - WordPress Newsletter Plugin

Now there's no need to pay for a third party service to sign up, manage and send beautiful email newsletters to your subscriber base - this plugin has got the lot.

1. Set Up a Separate Blog


As mentioned, probably the best thing to do would be to install a separate blog on your domain, something like mysite.com/newsletter/.  You could also set up a blog on a free service like WordPress.com or Blogger, but if you can, I would suggest keeping everything under one roof.


Another option is to set up a special category only for your newsletter, but then you will need to jump through a number of hoops in order to make sure that your category isn’t public and that your users sign up for ONLY that category.

2. Set Up an Account at FeedBurner

Remember to sign up your NEWSLETTER blog, not your main site.

3. Get Email Subscription Code


Continue through the sign up process until you get to the Account Management section. Once there, you will need to look for the Publicize tab at the top and then the Email Subscriptions link on the left. After that, you will need to click the Activate button.


Next you should automatically be taken to the Subscription Management screen where you should copy the code for your email sign-up form.


4. Place Code on Main Site

Take your copied sign up code and place it on your MAIN SITE. (You can also place it on the Newsletter site, of course, but the main thing is to place it on the main site.)

You can place the code from FeedBurner in a text widget if you like. Also, remember to put a label above or below the form that indicates it’s for a newsletter. You can reword the text in the copied code if you like, but it may be easiest to just create your own label. (If using a text widget, for example, then title the widget “Sign Up for Our Weekly Newsletter” or something along those lines.)

5. Send Out Your Newsletter

Whenever you’d like to send out a newsletter, then simply make a post on the Newsletter blog you set up.

When your users signed up on your main site for your newsletter, they were actually just signing up for updates from your private newsletter blog (although they didn’t know that).

Although you are somewhat limited to how you can style the emails that get sent through FeedBurner, you can include whatever links you like. So, of course, you can write a post on your Newsletter blog and link to content on your main site.

Configure Your Settings

You will want to make sure you go through each of the screens in the email section to configure your emails as you like. In these sections you can do things such as set the return address on the emails to look as if they came from your own domain.

Important Tip

On the Email Branding screen, you can set the subject lines of all your newsletters. For some, it may be fine to title each newsletter something like “The Latest News from Site XYZ.”

However, if you would like more control over your subject lines for each newsletter, then do as FeedBurner suggests under the “Hot Tip” section and place the following bit of text in the Email Subject/Title box:

${latestItemTitle}

When you do this, the name you give your post on your newsletter blog will be the subject line for the email that goes out for that newsletter.

Free, Stable, Simple, Reliable

If you’re just looking for a simple newsletter delivery system, then it’s hard to beat this method. It’s free. It’s stable. It’s simple to use. And perhaps most important, it’s reliable.

All four of those things are not always so easy to find in the world of email.
Read More...

Know your own Mobile Number [Quicktip] | Hacking Is Magic

When people buy a new SIM-card for your mobile, they cannot keep remembering their mobile number immediately. It takes some time to be got memorized. In India, mobile phone users are increasing rapidly. This trick will teach you to know your own Airtel, Idea, or Vodafone SIM-card number (Mobile number). What people can do if they forget their own mobile number when they want to recharge or want to give their mobile numbers to others? Follow this simple method and get your forgotten or new mobile number by just dialing some numbers with your mobile cell phone of any mobile number operator service. 

Know / Find your own Mobile Number

  • Vodafone*111*2#
  • Videocon*1#Bpl-*222#    
  • Reliance*111# or *1#     
  • Idea*100# or *789#    
  • Docomo*580#      
  • Airtel - Send SMS IM to 57070 or *282# or  *121*9# or *140*1600#
  • Aircel*#1#888# or *131#     
  • Uninor*1#     
  • BSNL  - *123# or call 24365 and ask them Loop - Dial  *222#
  • Virgin - Dial - *1# 
  • Aircel , Docomo*1# 
Read More...

5 Tips To Enhance Your WeChat Experience | Hacking Is Magic

WeChat came in at number 10 on our WhatsApp alternatives list. Back then, I was (and still am) slightly biased towards WhatsApp as I communicate through it with my friends and family communicate on a daily basis. However, work had me take a closer look at WeChat recently and I’m happy to report that WeChat is a very complete app with many cool and useful features.

Seriously, you might know WeChat by the basic features the app and many others like it provide but it’s the other extra features you will discover in this list that might interest you to give it a second chance, if you haven’t already. Let’s see how WeChat can enhance your messaging and social experience, shall we?

1. Use Web WeChat

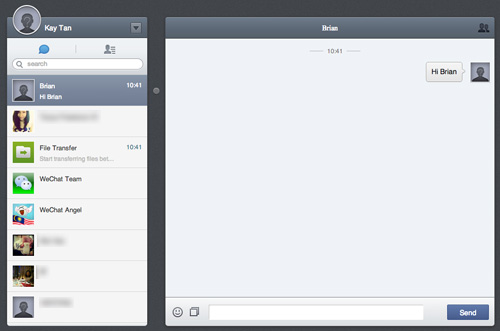
One thing that sets WeChat apart from other messaging apps is the ability to chat with your WeChat contacts on a computer. You don’t even have to download or install a program as you just need to access web.wechat.com on a desktop browser.

Then, scan the QR Code shown on the website with the app. You do this by tapping the Magic Wand icon on the top right corner and selecting Scan QR Code.
Once the QR Code is scanned, your web browser is temporarily linked to your device. Every message is synced between your device and computer.
Chat history displayed on your device won’t be shown on the Web browser but opened chats will be displayed for quick access. You can also start a new conversation with one of your WeChat contacts.

2. Transfer files with Web WeChat

Web WeChat also allows you to transfer files of less than 10 MB from your computer to your device. Large paragraphs of text can also be sent to yourself with this feature.
File types like PDF, MP3, MOV, MSOffice documents like DOCX and PPT as well as image files can be opened and viewed on WeChat. If a file is not recognized by WeChat, you can select and use another app installed on your device to open it.

3. Share only Text on WebChat Moments

The Moments feed works similarly to a Facebook feed where you can like and comment on photos shared by your contacts. Don’t want to share photos? Share text like a status update instead by tapping and holding the camera icon on the top right corner till a text box appears. Likes and comments apply.
Since you have to approve of contacts, only the people you approve will be able to see, like and comment on your photos or statuses.

4. Have Fun with WeChat's Social Features

WeChat has many fun social features that are not found on most messaging apps out there. These social features allow you to look for and chat with random people who are also using the app.

Look Around
Look Around lets you connect with random people who are physically around you. To use Look Around, you must enable Locations so the ‘matchmaking’ can commence. You can see the user’s name, custom status, their avatar or profile picture and their distance from you (it’s a bit off, to be honest).

Strike up a conversation with anyone. Note that when you are in Look Around mode, other users can look for you as well.
To remove yourself from this option, tap the three dots on the top right corner, then select Clear Data and Exit.

4. Shake

Shake is another feature where you can meet random people not too far from you. It gives you a random person (who is also using Shake) to chat with. You can choose to chat with the person or shake again to get another random person.
Users can only look you up if you are in this mode, so log out of it if you do not want a ‘Shaker’ to enter your life.

4. Drift Bottle

This is another cool feature to have fun with. You can now toss digital messages into a ‘sea’ and let random people pick up your message, keep it or add a reply before tossing it back to the ‘sea’. Your messages can be in the form of text or short audio clips.
If you just like the tossing and don’t want to connect with a fellow tosser, go to Settings > Features and disable the feature.

4. Let Friends Easily Add You on WeChat

You don’t have to give out your personal contact number to people who want to chat with you on WeChat. Here are 2 ways they can connect with you.

Use A Unique WeChat ID
Using a WeChat ID is like a unique username that doesn’t have to be your real name. You can only set it once so think this through. Once you’ve set this up, friends can easily search for you. You can set it up under Settings > My Profile > WeChat ID.

4. Share Your QR Name Card

There are also QR codes for you to share on your social networking sites. These QR codes come in a variety of designs. Pick one and insert your name card info, then save it to your device’s photo gallery. Your friends can then add you by scanning this QR code with WeChat. You can find this under Settings > My QR Name Card.

Read More...

10 Tips To Tighten Security on Your Android Device | Hacking Is Magic

Smartphones have come to define us by being the portal to our online identity and as such should be treated with care and secured against any wrongdoing online (hacking) or offline (stolen). If you are not careful, losing your smartphone may mean more than just a loss in contacts and phone numbers. We’re talking about your social media accounts, your synced files, important documents, your emails, photos and messages. Your entire information is traceable and downloadable and may be shared all over the World Wide Web if you are not careful enough.

While we’d love it if people don’t mess around with other people’s personal information, putting morale aside, this is the virtual world where thieves and hackers hide behind anonymity and are hard to trace. There is no one better to protect your own data, than you. We hope these tips and tricks will be of help in that endeavor.

1. Do Not Save all of Your Passwords

Many users tend to save their passwords to online services and sites on their device, never once thinking about what it would mean to a person who got their hands on the phone. Avoid having all important passwords saved in your device particularly when it comes to banking or payment apps.

2. Use Android In-Built Security

If you are running on Jelly Bean, you can have a screen lock and encryption enabled to further enhance your security. There are many types of screen locks available for you to choose from such as password, pin, pattern and face unlock, available in your Android settings. Even when setting pins or pattern locks, try not to make it easy for hackers to guess your password.

3. Lock Your Apps

It is necessary to lock your apps, especially the ones holding private information that you wish nobody but you could see. This is a second layer of security to prevent anyone from using your lost device particularly if they have managed to bypass your locked Android.

You can use a free app like App Lock for this exact purpose. The idea here is not to lock every single app in your device, just really data-laden ones like your email apps or file managers.

While you at it, avoid using a combination of a pin or pattern lock that can be traceable from the smudges of your screen (Yes, it is traceable).

4. The Importance of App Permissions

Before you begin installing an app from Google Play, a list of requested permissions will pop up to show you what permission the app requires. Apps require permissions to do things but not all of them are necessary.

Always read through the permissions to make sure they make sense and correspond to what the app actually does eg. an alarm app does not require a permission to access your text messages. This is a real important step because not all apps in the Play Store are safe.


While you’re at it, make it a habit to read the comments as well as the rating of the app that you are going to download. This helps you understand more about what the app really does without trying it out firsthand.

5. Securing Your Network

One of the most important thing in protecting your Android is to secure your network. Try to avoid using public WiFi whenever you want to do something important like doing your banking online. As long you are sharing the same network with the public, they can easily sniff out your packets and translate it into actual data of your private information i.e. your passwords.

You can protect your information by using apps like Hideninja VPN so that your outgoing connection is always encrypted, making it harder for anyone to sabotage your data. If you suspect that your device is being attacked, WiFi Protector can help fend off these attackers. To further enhance your network security you can apply settings from SecDroid but note that this app is only for rooted phones.

6. Use Mobile Security App

It will make your job easier to have an app that handles most of your security issue. Find a mobile security app that you are comfortable using, for example: Lookout Security & Antivirus and avast! Mobile Security. Even with a security app, you shouldn't let your guard down as Android malware is getting stronger and more rampant, which brings us to the next tip.

7. Create Multiple User Account to Protect Privacy

If you own an Android tablet and have to share it with a sibling, a spouse, or your kids, having multiple user accounts will help each of you protect your privacy. In Jelly Bean for tablet, there is an option for you to create multiple user accounts. You can create another general account for anyone who wants to use your device. The option is under the Settings > Users section.

8. Prepare a Backup of Your Data

A backup of your precious data is a must-have in the day and age of smartphones. Picture the worst case scenario where your Android device has been stolen or hacked. The last thing you can do is perform a remote wipe (see #10). Without a backup, you will lose all your information in your device.


Even if you could retrieve your stolen phone, chances are that hackers that have managed to access your device will render it useless. If you have a backup however, you can still restore your Android device back to its original state. You can choose to backup important information to the Cloud, your desktop or even to a flash drive, for insurance.

9. Track your Lost Device

So you have a backup already but you really want to get your lost device back. Well, as the smartphone industry would have it, your phone is built to be trackable, via GPS. The catch is, you have to enable GPS on your phone for it to be tracked. Fret not because, there are plenty of device-tracking apps for Android that can help you locate your lost or stolen device, some can even turn on the GPS on your phone remotely.

10. Enable Remote Wipe

So you are at the point where you have everything installed and ready to go. But, you still need one last feature – the ability for you to wipe your device remotely. This is necessary, especially when you are sure that your Android is lost (forever). There’s no crying over spilt milk now – we can only prevent them from turning it into cheese.

I recommend 3CX Mobile Device Manager because it is free and easy to use. You can sign up for the account here and let just hope that the day you need to use their remote wipe feature will never come.

Read More...

6 Tips to Improve your Laptop's Battery Life | Hacking Is Magic

Working on the go and your laptop has run out of juice? This problem plagues most laptops as they tend to lose their battery capacity over time. But worry not, as there are several ways to improve laptops' battery life without too much trouble.

So, here are 6 ways to improve your laptop's battery life.

Laptop Display


Similar to phones, laptop screen is also a power guzzler. Keep the brightness as low as possible. Also, If you also have keyboard back lighting, turn it off.

External Devices


Any external device plugged in the USB port constantly draws power from your laptop. Removing them after use conserves battery.

Overheating


Overheating leads to the internal fans to run faster - which in turn consume more battery. Use a laptop cooler to keep the temperature at bay.

Hibernate


Instead of putting your computer on standby, choose to hibernate - it saves the state of your computer and shuts down the computer and saves battery.

Windows Power Plan


Laptops running windows have built-in power plan settings. You can choose various items such as display brightness, when to turn off the display/hard-drives and USB power. Use these to improve your laptop battery life.

Battery Care


This application records the battery discharge cycle and also shows a detailed battery status including consumption, manufacturer, wear level etc. It also shows CPU and hard drive temperature to indicate any overheating.
Read More...