How To Reveal Hidden Passwords (Asterisks) In Web Browsers | Hacking Is Magic

In many places where you need to input your password to gain access, authorize or confirm a transaction, whenever you type passwords into the input text box, the characters automatically turns into asterisks or bullets. This is to protect your password from straying eyes.

However, in situations that require you to know what lies behind those asterisks, we’ve got a simple trick to reveal the passwords on your web browsers.

These hidden passwords are disguised with the help of simple HTML and CSS. So just changing the value of something specific will easily reveal what’s behind those bullets or asterisks  We’ll show you how this is done in Google Chrome and Firefox.

Google Chrome

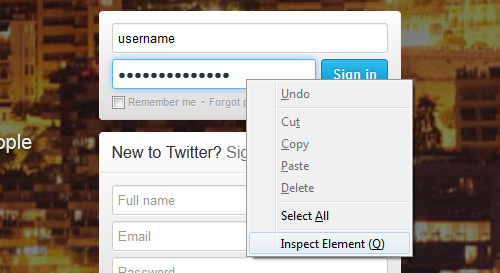
In any website which contains your saved password, right click on the password box and click on Inspect element.


You’ll now notice the bottom quarter of your screen filled with codes. You only need to focus on the highlighted (in blue) part to reveal the password.


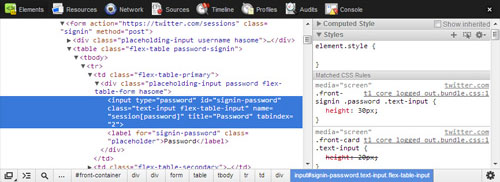
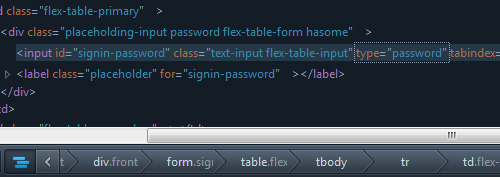
Look for type="password" and double click on it. Replace the word ‘password’ with ‘text‘.

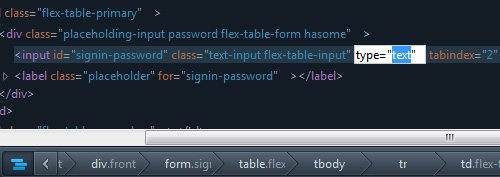
It should now look like type="text". Hit Enter.

After you’ve changed that, the text behind the asterisks or bullets will be revealed.

Mozilla Firefox

To reveal the password in Firefox, first, right click the password box and select Inspect Element.


A dark grey bar will appear at the bottom of the browser; click on the Markup Panel or hit Alt +M.


It will reveal a few lines of codes; the line you want to focus at is the highlighted line.


Again, look for type="password" and double click on it. Replace the word ‘password’ with ‘text‘ so it looks like type="text". Then hit Enter.


The password masked behind the asterisks or bullets will now be revealed.

Wrap Up

We have the tendency to hit the "Remember Me" option save our login passwords for easy access. After a while, it’s possible that we’d forget what the password was. This quick tip will be useful to help you retrieve your passwords from behind the cover of asterisks.
Read More...

How To Add Expiration Date To Shared Google Drive Folders | Hacking Is Magic

Tired of manually changing access permissions of your Google Drive files? It will be easier to set a cease-sharing date, something like an expiration date for the sharing permission. Beyond this date, the file no longer can be shared with the person you share it to.

By adding this Google Script on your Google Drive, you can set an expiration date to your Google Drive shared files. And all it needs is a script.

Integrating Google Drive

The first step is to make a copy of this script on Google Script. Click on File > Make A Copy.
Under EXPIRY_TIME put in the date (yyyy-mm-dd) and time the folder ceases to be shared. UnderFOLDER_URL, change the url path to the folder you want to set an expiration time to.
The folder URL that needs replacing must be the ‘link to share’ of the folder. To obtain the ‘Link to share’ URL, tick the folder you want to share and click on Share.
After doing so, you’ll see the ‘Sharing Settings’ page. Copy the ‘Link to share’ and replaced it in the script.
After all the changes, your script should look something like this.
Next, click on Run > Initialize.
It will ask for permission to access your data, click on Authorize.
After authorizing permission, click on Run > Start, and your folder now has an expiry date. You will receive this notification in an email. Easy isn’t it?
This script only works on Google Drive folder, so if you want to share a single file but with an expiration date, you need to place the file in its own folder. For now you can only set expiration dates for one folder at a time.
Read More...

How to Reset Windows Login Password | Hacking Is Magic

Windows 8, akin to its predecessors and many other modern operating systems, lets you create password protected profiles to make it possible for multiple people to share the same PC while keeping each user’s settings intact. This is quite handy, but can become an issue if a user somehow forgets their password. And if they are the only user with full administrative access, they’re apparently left locked out of the system. Previously we covered a detailed guide on changing a forgotten Windows 8 password via the System Repair Disk, but if you’re looking for a dead simple solution to reset a lost password, give Lazesoft Recover My Password a shot. This freeware application is designed to reset password of any Windows operating system including Windows 8, 7, Vista and XP. More details after the jump.
Recover My Password can reset the password with the help of bootable media such as CD/DVD or USB Flash Drive, which can be easily created using the app itself. The app can also retrieve product keys from unbootable Windows Installations. Along with support for multiple versions of Windows, the application is designed to work with various types and configurations of disk drives as well, including IDE, SCSI, SATA, USB, SAS and RAID. When it comes to file systems, it supports FAT, FAT32 and NTFS. To get started, you’ll need another PC for downloading and installing the app in order to create the bootable disk.
Lazesoft Recover My Password_Reset it
The application sports a barebones design, but that’s exactly what makes it user-friendly even for novice users. Once downloaded and installed, click the ‘Burn Bootable CD/USB Disk Now!’ button to open the Media Builder window.
Lazesoft Recover My Password
As mentioned earlier, the application gives you choice regarding the type of bootable media you may employ. You can also prepare a bootable ISO image that you can burn to a disk later. After select the appropriate from the available options and click the Commit button. In case of a USB flash drive, the utility will format any existing data on the disk, so make sure you backup any important content from the drive before proceeding.
Lazesoft Recover My Password_Media Builder
After formatting the drive, Recover My Password automatically starts creating the Recovery disk for you. Once done, click the Finish button and unplug the USB device or remove the CD/DVD.
Lazesoft Recover My Password_Media Builder_Done
Now boot the machine requiring the password reset using the bootable CD/DVD/USB drive that you just created. Also, make sure you have enabled the option for booting from removable media in your motherboard’s BIOS settings. Once booted to the screen as demonstrated in the screenshot below, choose the first option and press Enter to continue.
2013-03-05 15_17_19-Windows 8 x64 - VMware Workstation
Sit back and let the system load some required files that are necessary to complete the password reset operation.
2013-03-05 15_19_00-Windows 8 x64 - VMware Workstation
Once you are presented with the main application window, click Next to continue.
1
In the next step, you need to choose your operating system from the dropdown menu. This comes useful in case you’re running a dual boot machine. Once selected, click Next.
2
Now you need to choose the user profile that needs a password reset. The password recovery wizard also shows you other relevant details regarding the selected user under Account Properties. Select the require user from the list, and click Next.
3
This in turn will bring you to the last step of the recovery wizard. Here, you just need to click the RESET/UNLOCK button at the center to reset the password – it’s simple as that! Now click finish and reboot your machine.
4
Congratulations! You’ve successfully unlocked a password-protected Windows account profile.
5
Lazesoft Recover My Password is free for personal use, while a commercial license will set you back US$17.95, US$79.49, or US$159.69 for Professional, Server, or Unlimited Edition respectively. Testing of the app was carried out on Windows 8 Pro, 64-bit.

Read More...

How to Create Rules For MS Outlook & Receive Mail Alerts

Important Mail Alert is an MS Outlook 2010 add-in for creating rule-based alerts for defined keyword. It provides a desktop alert when an email matching the specified criteria arrives. Although rules can be easily configure in MS Outlook, however, it is much easier to use keywords to create rules for mail alerts. This add-in completely integrates with the MS Outlook interface, and provides access to all your recent alerts. The keyword based rules can be applied to all message elements, including the sender, subject, body etc, and tied to your configured email address (in the MS Outlook mail client).

Once this add-in is installed, head over to the AbleBits tab (which will automatically appear) and click theImportant Mail Alert option. Now, enter keyword(s) (e.g., Office Documents) and click Add rule. The keyword added as rule can be the email address of the sender, message subject or generic text from the message body of an expected email. You can select your preferred email address for applying the rule by clicking the cog icon.
Important Mail Alerts
Once the keyword is added, you will receive an alert when a message arrives in your Outlook Inbox. For example, if you are waiting for a mail from someone named “Ken”, you can add this name to then rule filter. When a mail arrives from this person, the name Ken will be detected and you will be provided with a desktop reminder that an email matching your specified criteria has arrived (as shown below). Click the reminder to open the email(s).

Alert
Other than MS Outlook, this add-in also works with MS Exchanger Server, and was successfully tested by us on MS Outlook 2010. Important Mail Alert (add-in) also works with previous MS Outlook versions, including MS Outlook 2003 and MS Outlook 2007.
Hacking Is Magic, Download Button, Red Download Button, Rectangle Download Button
Read More...

How to Maintain Notes & To Do List In MS Office

While working on computer, it is not unusual to forget about something you had to do. It often happens that while working on a document, we get brilliant ideas to add to it, but can’t recall them later. The usual thing to do is to either get a sticky note and jot down the idea on it, but finding a sticky note and pen or a pencil can take a lot of time, and distract you from the task at hand. If you create a text file on your desktop, there’s a fat chance that you will completely forget about the file after some time. Note&Do is an add-on for Microsoft Office that integrates with Microsoft Word, Outlook, Excel and PowerPoint, & enables a Notes and To Do bar in the right side of the applications, allowing you to take quick notes by typing or dragging & dropping text, noting down tasks that need to be performed. Each note and task is universal, in the sense that when a note is added to one application, it is viewable in all supported four Microsoft Office utilities.
After installation, you should be able to view a Note&Do for Microsoft Office pane on the right side of Microsoft Office applications. The add-on has two tabs, Notes and To Do. As the names suggest, the Notes tab is used for adding notes, while the To Do tab allows users to note down tasks.
New Microsoft Word Document - Microsoft Word
Under Notes, text can be added, either by first selecting the required text and then dragging and dropping it into the pane, or by double-clicking inside the pane. You can right-click on a Note to edit it or delete it. Moreover, you are allowed to change its color to Magenta, Yellow, Green and Blue fromCategory, turn the Autosize option On or Off, Bring the note to Front or Send it to the Back of the other notes and Pin it to Microsoft Office applications, including Microsoft Excel, Microsoft Word, Microsoft Outlook and Microsoft Powerpoint.
New Microsoft Word Document - Notes
The To Do tab of Note&Do lets you create task lists and categorize them with different colors. You can apply bold text for more important tasks, and mark them as complete once they are done. Tasks can be added by double-clicking anywhere inside the window.
New Microsoft Word Document - To Do
Note&Do works flawlessly on all four Microsoft Office applications, and is compatible with Microsoft Office 2003, Office 2007, and 32-bit & 64-bit versions of Office 2010, while Windows XP, Windows 2003, Windows Vista, Windows Server 2008 and Windows 7 are the supported operating systems.

hacking is magic, download button, red download button
Read More...